Showing posts with label Chocolate Cake. Show all posts

Graduation Season Part II: It's My Party!

It is official, my family knows how to throw an awesome party! With locally produced meat kabobs, a margarita bar, and everything occurring outside... this party was screaming my name! Today's post is about my family, me, and the amazing food that was at my graduation party.

As some of you may know, I am a meat locavore. This means that I eat meat only if it has been produced locally (i.e. raised and butchered locally - not simply packaged locally). All locavores have different parameters for what defines "local" - for me, I only eat meat that has been produced within 70 miles of wherever I am. Now, I looove meat and am not a vegetarian as many people mistakenly believe. Heck, I grew up on a dairy farm where we would pluck our own chickens for dinner and name our beef cattle after food to remind us that our "pet" would one day be our dinner. So I get it... the circle of life. It happens. In fact, my reasoning for being a locavore is that I am passionate about supporting small, local farming. I have been dedicated to this method of meat consumption for over three years now and over the course of that time, I have had many people ask me why I don't eat very much meat, especially considering the fact that my immediate and extended family all farm. My answer to this is that I not only support small farmers, but I also see no point in shipping meat from California to the Midwest (for example) when there is undoubtedly a meat-producing farm within at least a 70 mile radius of where I am. All of this shipping is not only wasted emissions, but is also upping the price which the consumer must pay to buy the meat at the store and decreasing the price our farmers receive for selling their meat. SO, with eating locally being such a passionate dedication of mine, I was pretty excited to hear that all the meat being served at my party... would be local! YAY!

My older sister Krystal and my Mom were the ones planning this fiesta. The menu consisted of orderves (meat/veggie kabobs, fruit kabobs, my Grandma's seafoam salad (trust me... it's amazing. I will have to dedicate an entire post to this stuff!), cheese produced from my aunt and uncle's dairy farm, a summer pasta salad, and guacamole (and not just any guac... this was Krystal's guacamole. I don't know what she does to it, but it is always amazing. She's given me her recipe, but mine never tastes the same... I have come to the conclusion that there are some secret ingredients at play here.). Oh... and then there were my cupcakes. Yum. Everything was made from scratch. Everything fresh. Everything delicious.

So I have never been terribly dedicated to cupcakes, I've actually always been more of a cake girl. But since making these little buttercream mounds of happiness... I'm hooked. For this party, I made three flavors. The first was a dark chocolate cupcake with a "healthy" (ha!) amount of light and fluffy white buttercream on top. They were then finished off with a little bling by adding some glitzy white sugar pearls (as recommended by my little sis', Michelle). Nice work Michelle, you were right (you may now imagine me furrowing my eyebrows at you).


This is my little sister Michelle. She also did a lot of the cooking and baking. She was like everyone's sous-chef. Michelle rocks at making scrumptious desserts; her specialty is crazy desserts I can't even begin to pronounce the names to. Her desserts are like the kind that you might be served in some five-star French restaurant. Since she has been baking more and more lately, I made her a super chic apron...


So the second cupcake flavor I made was key-lime. Yep, you heard me right. Key-lime. It was delicious. I used a white cake batter for the cupcake and for the buttercream, I used almond extract instead of clear vanilla (since sliced almonds go perfectly on top of a key-lime pie) and then squeezed about 1.5 ounces of lime juice into the buttercream. This was a refreshing and perfect summer's night cupcake.


The third and last flavor cupcake I made, was strawberry. Again I used a white cake for the cupcake. Then, starting with my basic white buttercream, I mashed enough strawberries to produce about 2 ounces of strawberry puree and again topped these cupcakes with white sugar pearls. Since buttercream has a high content of fat (ahem, it IS buttercream) and the strawberries are, well, strawberries (and are therefore composed of essentially sugar and water), the two didn't blend perfectly together and created more of a streak-effect. They looked pretty neat...


The party was outside on the patio that my Mom and Dad built by hand (the party was in Wisconsin, on the farm where I grew up). Oh, and the flower arrangement on this table was created by my little sister Michelle using clippings from various plants around the farm. So beautiful.
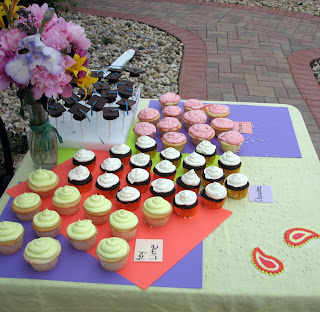

I also made some graduation cake pops, similar to the ones made last week for Andrew's Graduation Cake - except for these ones, I made the tassel blue to match my own graduation tassel. I think I turned my cousin Dean into a cake pop lover as well.


The actual orderves at this party were not only local... but were tasty. Super tasty. My sister Krystal was in charge of the kabob front, she's pretty much a master behind the grill. Oh, and see that person off in the distance, staring at the camera? Yep that's me. I'm holding a stick with pineapple on the end like a caveman. For some reason I thought the picture was of me even though my sister was obviously between the camera and I. But hey, it's my party right? Shouldn't the camera always be on me?... No?! Hmm, shoot.


You can see a few of the harvesters and the barn off in the distance. This is where I grew up. This is my stomping ground. I've done a lot of travelling, and this is still my favorite place on Earth. Sorry for going mushy here, but it's true.


So to make this party even better, Leah, one of my best friends from high school, came by. We've actually been friends since first grade. Leah is one of the most hilarious people you will ever meet.


These folks are my Mom and Dad. I am who I am because of these two amazing people. You may think I am being biased here, but I don't think there's ever been a better Mom and Dad duo than mine.


My party had a lot of great food at it, but what's more important is that I was surrounded by people who I know and love and who have been such a major part of my life. I am so lucky to have such a supportive family and wonderful friends. Thank you everyone for supporting me in everything that I do.

p.s. Thank you for such a great party, I feel so loved.

Graduation Season Part I: The Graduation Cake

This is a two-part series. I recently made a massive graduation cake and in the coming days, I will be posting a whole lot of super cute graduation cupcakes!

So I have been talking this graduation cake up for quite some time now. You know... the one that needed to feed 100+ people and was going to be covered in beautiful golden fondant?

Well, there were a dew mishaps along the way. You see, I have a killer chocolate cake recipe... and I mean killer. This chocolate cake is so moist that it will make your taste buds think they've died and gone to heaven. I designed this recipe myself (after a lot of trial and error), but have used the recipe quite a few times since evolving it, so it has stood the test of time. Unfortunately however, I have never baked this recipe in a 12x18 inch pan. So ultimately what happened (to make a very long story... so very much shorter than it really was), my chocolate cake recipe uses an oil to achieve part of its moistness and because in this scenario I was using such a large pan and was therefore using a longer baking time... all the oil separated and sank to the bottom of the pan, leaving the top half of the cake mega fluffy and dry while the bottom half was more dense than a 90 lb pound cake, yuck!


So in the end, I used a different recipe - one that was far less moist and far less chocolaty - the new recipe was more of a generic type that not even my cat could mess up if she had thumbs. Since I was using a dry cake recipe, I decided to ditch the plans of draping this cake with fondant (since fondant is really only good on a moist cake) and decided to use my buttercream recipe instead.

The graduate requested that this cake be marble so for each pan, I made two batches of chocolate cake and a quarter batch of the yellow cake. Then, it was dollop time!


Followed by swirl time!


Oh yes, and I used a TON of eggs! (and butter... of course)

The baking time for this cake was an hour... so with the weather being in the balmy 90's, I was in one hot apartment!

It took three 12x13 inch pans to assemble this cake.


After baking the cakes, I arranged them onto a large wooden board covered with foil and plastic wrap to make it pretty. Once the cake was covered in orange buttercream, I wrapped a 1-5/8 inch black ribbon around the border to tie in the school colors (black and gold) and to make the buttercream look less sloppy (after all, I had my mind set on fondant, so I struggled to comprehend that the buttercream was going to give the cake less of an elegant effect and more of a "I want to eat this cake right now" effect).


And of course, no job is ever finished until it has been attacked with cake pops...
(and no, those are not peanut butter cups, I used a candy mold to make the ridges and there's chocolate cake when you bite through the chocolate)


Then after using chocolate to glue the chocolate tops to the chocolate bottoms...


...and some lemon licorice tassels...
The graduation cap cake pops were finished!


Then since this graduate is a track and cross country athlete, I drew each sport's symbol in dark chocolate. Below is the track symbol and you can see the cross country symbol in the last picture of this post.


Lastly, I baked an extra chocolaty mini cake for the graduate. His favorite cake is dark chocolate. All of the cake that I had made up until this point was marble since that's something more people at his party would like. I figured that since this graduate was willing to sacrifice getting his favorite cake at his own party, I could make him a personal, extra moist, extra chocolaty cake.


Once I stuck the cake pops into this cake, it really looked nice. Everything pulled together and everyone was happy with the results.

Congratulations Andrew!

The Start of a Cake Pop Romance

Time for a reunion! With summer drawing closer and closer every day, I am antsy to get back to my kitchen. I have some fun experiments and tasks ahead, so I suggest you grab on for the ride!


Wayy back when, in February actually, my friend Anna had a birthday. Luckily, I am better at making sweets and getting them to my friends on their birthday than I am about telling you about those sweets on time! I am currently finishing my last semester of college and therefore am in a house with a bunch of nuts-o people who are really good are talking like valley girls and never turning lights off (currently, one of them is confused by how the microwave burned her popcorn) Don't worry honey, small and easy steps, you are smarter than the microwave!!?
This is all besides the point though. My friend Anna, she had a birthday. I made these delicious cake bites and a mini cake...


Cute huh? I actually got the cake recipe from my sister. Genius idea. The cake bites surrounding the mini cake were so good that the owner of the five-star restaurant actually wanted my recipe! hmm, leverage... this is good when there's food and wine involved! The recipe is originally from Bakerella, the cake pop queen. Basically, you buy a bag of Oreos, eat seven, crumble the rest and pour them into a large mixing bowl, then mix and mash 8oz of cream cheese in with the oreos until you have a chocolaty heap of deliciousness, and then form into balls, cool and dip.

Anyway that was February, this is May. The beginning of a new month! A glorious month I might add; I will graduate in May and can't wait to get back to the cities where my boyfriend, cat, and kitchen await me... another summer of homemade bread is just around the corner, I can smell it.

I had the opportunity to get a brief glimpse of summer recently while away from my studies for the weekend... I made cake pops! -and it was a success I might add, thank you very much (my first attempt at cake pops was a complete flop, check out my first post). The difference is that I tried to make the pops without Bakerella's Cake Pops book, now I have a copy. I recommend you don't try this without the book, it's bad for your self esteem and anyone near you.


I chose the color "orchid" for my candy coating. I thought it was fitting. The cake is a vanilla funfetti (yes, I used a box cake, I was ashamed to even walk up the the register with it. But it's what Bakerella recommends on your first try, so I followed command and look what I made! Proof that Bakerella knows best. There's also vanilla buttercream frosting mixed in with the cake - that's how you are able to form the round cake ball. Super tasty but not the best aesthetically. I was curious if the funfetti sprinkles would still show up after i created the cake balls... they don't. You just end up with a brownish vanilla cake. Oh well, I tried.


So these orchid-colored cake pops are my tribute to the almost-start of summer. Yay! I am anxious to jump into some of the more complex cake pop designs, so stay tunned for that!

Also, I have been working on my cake decorating skills and am anxious to put them to the test in a month when I will be making a massive high school graduation cake! The designing is currently under wraps. I can guarantee that it will be awesome though so stay tunned as i will be doing some test runs on the fondant (yes, I am braving that road again!) now that I have glucose syrup and glycerin.

Don't rush it... and don't take it out on the cat

Yesterday I began a project involving cake bites and fondant. The cake turned out well for what I was to use it for. Surprisingly, the cake recipe was not nearly sweet or chocolaty enough, however that should have been expected since there was no butter involved and bittersweet cocoa was the only source of chocolate. I followed tips found in "The Essence of Chocolate", by John Scharffenberger and Robert Steinberg- in That Chocolate Cake recipe, the water is brought to a boil and then mixed in with the other ingredients. I liked this technique as it improves the cake's texture, helps with blending, and brings out the flavors of the cocoa and sugar. The mixture was quite soupy when put into the oven, but came out nice and moist after 40 minutes.


After allowing the chocolate cake to cool, it was crumbled into a bowl and mixed with cream cheese frosting. After dipping my hands into a fresh bottle of olive oil, I began forming 2 to 2-1/2 inch balls, placing them on wax paper. So far so good right?


Knowing the cake bites would be far more workable if I refrigerate them for a few hours or even put them in the freezer for an hour, I was far too anxious for the end product... I decided to continue with room-temperature cake bites. Since the idea was to wrap a fondant bow around them and turn them all into little presents, I proceeded to shape the balls into squares. The chocolate bark was melted and ready so I began dunking my little chocolate presents in the bath of brown bark.


First cake bite out, on the parchment paper, and looking good! Second cake bite out, on the parchment paper, and also looking good! Okay, so this might be just as easy as dunking bon bons in chocolate for Christmas right? Nope, not really even remotely that simple- I soon found that with the more time each cake ball spent at room temperature, the less the cream cheese frosting seemed to act as an adhesive. Eventually, after covering only half a pan of cake bites, I found myself with not only lumpy square cake balls, but was even stuck with lumpy chocolate bark since each ball that went in for a dunk lost chunks of cake in the process. I soon concluded that it would be easier if I take the time to cool all of the cake bites and then proceed with the dunking (using a new, non-lumpy, batch of melted chocolate bark).

Two hours later I returned to the remainder of my now chilled cake bites and proceeded with the dunking. Pleased with the ease of forming and dunking the remaining bites, I dove straight into preparing the fondant... after all, the fondant recipe I was following recommended allowing 10 minutes of preparation start to finish...Half an hour later I was still kneading the fondant. I decided to call it a night. Finally the next morning I took a deep breath and dove back into my fondant mode. The heap of mushy white stuff, presumably fondant, from the night before remained the same: a sugary mess. I decided to soldier on and follow the recipe since I have doubted myself before while in the middle of a recipe and voila... by the end, things always seem to turn out like the recipe says it will, right?. Pulling out my fondant recipe once more, I looked to where I had left off: "...roll fondant out on a clean surface that has been dusted with confectioners' sugar until it is 1/8 inch thick or thinner... cut into strips to make bows and other decorations." Yes, my heap of fondant was complete... and yet it was not smooth and play-doh-like, but was coarse, grainy, and not even remotely elastic-like. All I could do at this point was keep going and hope for the best.


Removing the cake bites from the fridge made me wish I had a better air conditioner- my chocolate-covered cake bites were now starting to sweat. Great. Rolling the now yellow-dyed fondant onto the sugar-covered counter top and thinly slicing a ribbon, I moved the fondant to my first cake bite specimen. I gently worked to lay the fondant atop a line of sticky chocolate frosting (aka glue) already in place on the cake bite, which was lining where the fondant ribbons would go. Well over 30 minutes later, I finished my first cake bite. Sweating and frustrated, I threw down the toothpick I was using to shape the fondant and subdued to trashing the "short cut" fondant recipe. Leaving the house in search of what I would need to make fondant the right way, I tried to find the lesson I was to learn since I knew there had to be one somewhere within that thick mess of a fondant pile.


Now, hoping this is my last lesson on the short-cut subject, I confess that I have learned the hard way that it is best to not take the short cut or easiest way out in baking... and that no matter how much your kitten may love to jump up and clamp her claws into your beautiful silk tablecloth, you should not take your lack of fondant skills out on her... sorry Lila.

I am now on a hunt for glycerin and glucose syrup, once I have found these ingredients I will be right back at the forefront of fondant making. Until then, it's time to make bread!

Update! I have mastered fondant! I am now forging my way through mounds of fondant and am making and selling cakes with a fondant recipe that I actually designed!