Showing posts with label recipes. Show all posts

Congo Bars

Umm yes, that is me in the purple sweater and yes, that is Bakerella!  I know, I can hardly believe it myself... I got to sit next to her!  Oh my gosh.  She even signed my Cake Pops book!  Oh my gosh.  


Turns out, she not only rocks at making amazing sweet treats - she's even a sweet gal in person.  


So this week I decided, in honor of finally meeting Bakerella in person, I would indulge in one of her very own recipes.  Congo Bars to be exact.  It's kind of like combining a brownie with a cookie and then taking the level of amazing x10


Here's my rendition of Bakerella's Congo Bars...

Congo Bars
2 3/4 c. flour
2 1/2 t. baking powder
1/2 t. salt 
4 T. cocoa powder 
2/3 c. butter (softened) 
1 lb. light brown sugar
3 eggs
1 t. vanilla
11.5 oz. package chocolate chips (I used dark chocolate chunks)
Powdered sugar for garnishing

1.) Prepare a 13x9 inch pan and preheat oven to 350 degrees Fahrenheit.  
2.) Mix flour, baking powder, salt and cocoa powder in a large bowl. Set aside.
2.) In a separate bowl, beat butter and sugar together until light and fluffy.
3.) Add room-temperature eggs, one at a time to sugar mixture.  
4.) Add vanilla and continue to blend on low.
5.) On low, add flour and mix only until combined.
6.) Stir in chocolate chips.  Spread batter into pan.  
7.) Bake at 350 degrees Fahrenheit for 30-35 minutes or until inserted toothpick comes out clean.  
8.) Sprinkle with powdered sugar.  

Happy Baking!


Pumpkin Pie Cupcakes


It's finally fall which means it's time to put pumpkin in everything anything you bake!  I have always loved pumpkin bread, pumpkin bars and of course pumpkin pie, so I thought why not make pumpkin cupcakes?!  I first made and ate most of these cupcakes (not all by myself, but almost) without any form of frosting... I ate a lot of naked pumpkin cupcakes.  I did this mostly because I couldn't figure out what kind of frosting I wanted to put on them, but also because these cupcakes are so moist and full of flavor on their own that they really didn't need a topping.  However I decided, when I have the opportunity to make buttercream, I just can't pass that up!  


Note: I have wanted to try these cupcakes with cream cheese frosting, I think that would go really well with their sweet, pumpkin base.  Otherwise just a dollop of whipped cream would go well with these just like whipped cream is good on top of an actual pumpkin pie.  If anyone tries something other than buttercream, please let me know how you like it!

The first time I made these cupcakes, I used canned pumpkin, which by the way is so easy!  To be honest, I've never used canned pumpkin before these cupcakes!  I've always used either a fresh pumpkin or pumpkin that I had frozen myself.  But canned pumpkin was certainly a nice break from my normal pumpkin baking experiences - not that I'm saying we should all starting using canned pumpkin for the rest of forever. A freshly prepared pumpkin is still the best in terms of flavor and making your house smell good (something that's very important to me).  Plus, why not buy a local pumpkin now that they're popping out of every farmer's ears?


The most recent time I made these, I used fresh pumpkin.  I wanted to try something new though, so steamed the pumpkin on the stove top as opposed to baking it in the oven.  Steaming was a much faster process, I recommend it (if you want to give this a go, my directions for steaming a pumpkin are at the bottom of this post).  Keep in mind however, you're probably losing more of the pumpkin's nutritional value with steaming than you would with baking.  


OH and by they way... I finally have a new mixer!  It's so pretty.  I touch it every time I walk through the kitchen just to make sure it's actually there.  Thank you to my parents for the wonderful birthday gift!


And this was my birthday gift to myself... yay!


These were my thank-you gifts to my new co-workers...


And these, were for anyone who came to visit me while they were in my kitchen.  Since the recipe has both crystallized and ground ginger in it, I thought it would be fitting to sprinkle some crystallized ginger on top of the buttercream.  This was good and looks really nice, but only if you really like ginger.  


Pumpkin Pie Cupcakes 

Ingredients: 
  • 2 c. all-purpose flour
  • 1 (3.4 oz.) package instant butterscotch pudding mix
  • 2 t. baking soda
  • 1/4 t. salt
  • 1 t. ground cinnamon
  • 1/2 t. ground ginger
  • 1/2 t. ground allspice
  • 1/4 t. ground cloves
  • 1/3 c. finely chopped crystallized ginger
  •  
  • 1 c. butter at room temperature
  • 1 c. packed brown sugar
  • 4 eggs
  • 1 t. vanilla extract
  • 2 c. pumpkin puree


  1. Preheat an oven to 350 degrees F. Prepare 24 paper cupcake liners. Whisk together the flour, pudding mix, baking soda, salt, cinnamon, ground ginger, allspice, cloves, and crystallized ginger in a bowl; set aside.
  2. Beat the butter, white sugar, and brown sugar with an electric mixer in a large bowl until light and fluffy. The mixture should be noticeably lighter in color. Add the room-temperature eggs one at a time, allowing each egg to blend into the butter mixture before adding the next. Beat in the vanilla and pumpkin puree with the last egg. Stir in the flour mixture, mixing until just incorporated. Pour the batter into the prepared muffin cups.
  3. Bake in the preheated oven until golden and the tops spring back when lightly pressed, about 20 minutes. Cool in the pans for 10 minutes before removing to cool completely on a wire rack.


Steamed Pumpkin


What you'll need: 
Large pot with 1-2 inches of water in the bottom
Metal Steaming collander
1 small pie pumpkin
  1. Carefully cut one pumpkin in half next to stem.  If the stem is going to make the pumpkin too large to fit in the covered pot, cut off the stem.  
  2. Place steaming colander in the bottom of a large pot filled with 1-2 inches of water.  
  3. Place both halves, cut side up, in pot with 1-2 inches of water in the bottom. 
  4. Steam for 15-20 minutes or until fork will easily insert through the pumpkin's meat to the shell.  .  
  5. Remove pumpkin from steam bath and set aside for 10 minutes to cool.  Then scrape pumpkin from shell into a medium-sized bowl.  
  6. Beat on high until pumpkin is smooth and even in consistency.  
  7. Add to any recipe and enjoy!  
Note: Do not add hot pumpkin to any recipe!  Place pumpkin in fridge (or freezer for a short period of time) until cool.  

Happy Baking!

Healthy Cookie Secrets!

Yep, you read it... healthy cookies. Oh yeah, I went there! I recommend you read this with a bit 'o optimism... I promise you'll be surprised!


These are very tasty and will hit your sweet tooth on the head without spoiling your whole day of healthy eating. What's better yet, is that when I put this recipe together, I did it with the intention of making it kid-friendly.

You know how sometimes kids demand something they shouldn't have? They are certain that living off Nilla Wafers and Oreos is totally doable and that they aren't going to be happy until you allow them to fulfill their dreams of a cookie-only diet. They pull your hair, hold their breath, tell people in the grocery store that they don't actually know you, and leave you wishing they were still young enough to take a pacifier.

Well... hopefully the recipe I am providing you with will help maintain your sanity and keep your little tikes healthy (but lets keep the fact that these are healthy cookies between just you and me).

So basically my goal was to disguise these little miracles as cookies while keeping the fat and calories down, yet including some healthful nutritional aspects (such as potassium, whole grains, protein, thiamin, and magnesium) ...so you're not left with an "empty calorie" snack.


Healthy Cookie Secrets
Ingredients:
1/2 cup butter (unsalted and at room temperature)
1/2 cup honey
1 egg
1 cup mashed super-ripe banana or applesauce (or you may opt to use 1/2 cup of each - keep in mind that the cookies will be fluffier with banana and denser with applesauce)
1 cup rolled oats
1-1/2 cups multi-grain flour (or whole-wheat, but multi-grain is arguably healthier)
1/4 cup oat bran (or wheat germ, flax seed, or a mix of the three)
1/2 teaspoon baking powder
1/2 teaspoon baking soda
1/8 teaspoon sea salt
3/4 teaspoon cinnamon (optional)
1/4 teaspoon nutmeg (optional)

*I also mixed in sliced/toasted almonds, raisins and craisins - all combined to equal 1 cup. Feel free to play around with this part though... if you are in need of a small chocolate fix, add a small handful of chocolate chips, at least these will calm that craving before you attack the carton if ice cream in the freezer, right?

Instructions:
1. Preheat oven to 400 and grease 2 cookie sheets.
2. Cream butter and honey together, add egg. Mix in banana (and/or applesauce) and oats.
3. Combine remaining dry ingredients in separate bowl. Mix dry ingredients into butter/honey mixture. Hand stir nuts, dried fruit, etc. into batter.
4. Drop by spoonful onto prepared cookie sheets and bake for 12 minutes in preheated oven.


P.S. I recommend crumbling these cookies into your yogurt for a healthy, protein-rich lunch. I love using The Greek Gods Greek Yogurt (Honey Flavor), it's seriously delicious and is filled with loads of calcium and protein.

Happy healthy snacking!

(Thank you Christina and Nora in Madison, WI for requesting a healthy cookie recipe!)

Heirloom Chocolate Chip (or M&M) Cookies


These cookies are quite delicious. I have some larger baking projects up my sleeve (mua ha ha ha ha!) so while I am brainstorming and gathering all the tools I need to complete these projects, I have decided to take a break for these classicly yummy M&M Cookies!

This is what I would call an heirloom recipe. This recipe has been in my friend's family for generations - no one really knows what generation it first started in however. The first time I tried a cookie from this recipe, I was probably no more than 10 years old and was at my friend's house for a sleepover. In the morning I woke up to these wonderful cookies and was given a bag of them to take home to my family. After my mom had a taste of these little yummies, she managed to get a copy of the recipe. Yay!

So here I am sharing the original recipe with you. Originally, the recipe called for mini chocolate chips (not M&Ms as I have done - but I sometimes like a little rainbow in my cookies!). The cookies will turn out very soft and chewy - perfect for a tall glass of milk! I recommend making the traditional recipe, but feel free to substitute the chocolate chips for M&Ms, walnuts, mini peanut butter cups, etc.

Heirloom Chocolate Chip Cookie Recipe

1/2 cup granulated white sugar
1/2 cup brown sugar
1/3 cup butter (unsalted and at room temperature)
1/3 cup crisoco (or more butter)
1 egg
1 teaspoon vanilla
1-1/2 cups all-purpose flour
1/2 teaspoon baking soda
1/2 teaspoon salt
1 package mini chocolate chips

1. Cream together: white granulated sugar, brown sugar, and 1/3 cup butter. Add Crisco (or another 1/3 cup butter) and cream together for one minute.
2. With mixer on low, beat in egg, vanilla, baking soda, and salt.
3. With mixer still on low, slowly pour flour into batter, mixing just until ingredients are combined.
4. Fold chocolate chips into dough using a spatula.
5. Bake at 350° for 12-14 minutes.

Monkey Bread!

Who loves the smell of bread and cinnamon together?! Now add my secret ingredient: apples! (Ahem, those of you following me on Twitter: apples were the secret ingredient!) Yay!


This monkey bread is moist, sweet (but not too sweet - it's perfect with coffee or an earl grey tea, whatever your poison may be) and is super easy to make. For those of you who have never heard of or eaten monkey bread... it's kind of like a cinnamon pull-apart but is at an entirely higher level of awesome!


I grew up seeing my mom make monkey bread in an angel food pan but have noticed that a lot of people like to use bundt pans. I love a moist, fluffy bread that really rises, so used the large angel food pan here. I recommend either using an angel food pan as I have done or cut the recipe in half if you really want to use a bundt pan. This recipe will rise a lot so tying to fit it all in a bundt pan... well, lets just say that you may end up with a very messy oven and a strong hatred for me.
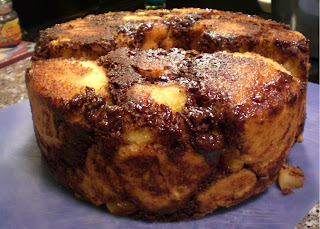

For this recipe you will need to make a bread dough first; then you can add the ooy-gooiness that makes this recipe oh sooo yummy!

Step One: Make Butter Rolls

Moist Butter Rolls Recipe
Ingredients:
2 packets yeast
1/2cup + 1 Tablespoon granulated sugar
1 cup milk
3 eggs
1/2 cup butter
4-1/2 cups flour (both white and wheat work well here without substitutions)
1/ teaspoon salt

How-To:
1.) Mix yeast and 1 Tablespoon sugar together. Add warm (not hot, you don't want to kill the yeast!) milk and whisk. Also whisk in: remaining 1/2 cup sugar, salt, and melted butter (I recommend melting the butter, then letting it cool for a few minutes before adding it - this way it won't kill the yeast).
2.) Beat eggs lightly (until somewhat lighter in color) and add to yeast mixture.
3.) Gradually add flour until the dough is pulling away from bowl. Knead for three minutes on a floured surface.
4.) Cover with damp towel and let raise 30 minutes in warm environment.

Step Two: Turn the Butter Rolls into Monkey Bread!

Monkey Bread Recipe:
Ingredients:
1 batch homemade bread (I recommend using the Butter Roll recipe used above)
1-1/2 cup granulated sugar
3 Tablespoons ground cinnamon
1/2 cup melted butter
1/4 cup whipping cream
2 apples cut to the size of candy corn(you can also substitute with raisins - use 1-1/2 cups raisins if you choose to go this route)

How-To:
1.) Grease one angel-food pan and set aside.
2.) In small bowl, mix together cinnamon and 3/4 cup sugar.
3.) As you cut golf ball-sized pieces of bread dough off homemade bread, dip one piece at a time into the melted butter and then into cinnamon/sugar mixture. Place in greased angel food pan and repeat until you have covered the bottom of pan with an entire layer.
4.) Sprinkle half the chopped apples or raisins. Then add a second layer, following the process explained in step three. Continue this pattern until you have used all the bread and apples/raisins.
5.) Whisk whipping cream, butter, and remaining 3/4 cup sugar together just until color and texture lightens. Pour this mixture over the top of bread and apples/raisins.
6.) Bake at 350 degrees F for about 45 minutes minutes or until inserted toothpick comes out clean.

*Serve immediately, store in air-tight container.

Lemon Love Notes


Happy Memorial Day!

It is HOT out today, which is partly why I abandoned my plans of making a red, white and blue dessert (I will make this for the Fourth of July holiday instead) and opted for something a little more refreshing - Lemon Love Notes!

Although this dessert does not represent the colors of our flag, it is yellow; and yellow is the color of the yellow awareness ribbon meaning "Armed forces return". Since Memorial Day exists as a day to honor those who have died while serving this country, I feel it is fitting that while we are honoring those lost, it is also fitting to honor those currently serving and to hope that they return safely.

If you love lemon, you will love these. If you love coconut you will love these. Aaand, since I know there are soo many of you who do not like coconut... I have a version of these summer delights that even you will love!! Everyone happy now?


Lemon Love Notes
Ingredients:
1-3/4 cups flour
1/2 teaspoon salt
1 cup butter
3 cup confectioners sugar
1 egg
1-1/3 cup coconut*
1 tablespoon grated lemon peel ...or... 2-1/2 teaspoons lemon concentrate
1/4 cup lemon concentrate
3 drops yellow food coloring (optional)

*This recipe is very tasty without coconut too, so feel free to leave this ingredient out - no substitutions or modifications need to be made if you omit the coconut.

How-To:
(Base)
1. Grease one 8x10 inch pan and preheat oven to 350°F.
2. Beat in a bowl: salt, butter, and 1 cup sugar.
3. Add egg to butter mixture, then add flour.
4. Stir in 1 cup coconut and 1 tablespoon lemon peel (or 2-1/2 teaspoons concentrate).
5. Spread on pan, bake 30-35 minutes (until golden brown).

(Glaze)
1. Beat together: 2 cups sugar, 1/4 cup lemon concentrate, and food dye (optional).
2. Spread sugar and lemon mixture on top, then sprinkle 1/3 cup coconut on top of glaze.
3. Cool completely. Enjoy!


Ladybugs and Flower Power

Outlining and flooding sugar cookies with royal icing was the task of this week. I am finally finishing my last two weeks of college so have postponed the fondant until I graduate (May 22, wahoo!).

If you want cleanly detailed cookies, royal icing is the best way to go. For those of you who have only had the pleasure of eating royal icing: meringue (i.e. egg whites) is one of the main ingredients. As with any recipe where raw eggs are used, there is always the risk of salmonella so meringue powder is often recommended, particularly if cooking for a large crowd where older adults and children may be present. The down side to meringue powder however is the flavor. There is this rich, sweet taste to royal icing when you use real egg whites and the texture is soft and creamy. Not that meringue powder tastes terrible, but there's no doubting the deliciousness of fresh, from-scratch ingredients.

Speaking of from-scratch ingredients, my garden seedlings are anxious to get into the ground and I am anxious to dig in the dirt. Three more weeks before the soil will be ready for me though so until then, creating a sweet bouquet of flowers must remain strictly kitchen business...


With my college commencement rapidly approaching, the campus has been springing to life as the grounds crew grooms the campus to perfection. There are so many flowers blooming on campus that you don't even have to bend towards a blossom to smell the sweetness, this is definitely my favorite time of the year.

There is a cute little kitchen supply store here in Decorah, Iowa called Ace the Kitchen Place. In fact, it's the only kitchen supply store in little Decorah... and they have one of the best collections of cookie cutters I have ever seen. Just to give you an idea of how extravagant some of the cookie cutters at this place are, I will simply tell you that recently, at a friend's wedding, one of the gifts just so happened to resemble one of her favorite animals... it was a goat cookie cutter!

Not that I'm making any goat cookies here, but I did find a fun design do go with my flowers...


Ladybugs! ...and no, these are NOT those pesky, stinky Asian Lady Beetles, these are Ladybugs... big difference.

So outlining and flooding...
this refers to a process where you start with a stiff royal icing and pipe an outline for each color you are going to use on the cookie. After you have outlined the border for each color on the cookie and there are no holes in the outline, you thin the royal icing and "flood" each compartment with it's respectful color.


I was originally going to make a sunflower but in the end, couldn't bring myself to do it - sunflowers and I have a bad relationship at the moment. You see, a couple months ago I planted some little seedlings that will eventually go into my garden. These seedlings are currently in one of the campus greenhouses. Because these seedlings are not for a research project or anything directly beneficial to the college, I was given permission to use the greenhouse only if I kept my little seedlings on the floor. This was fine with me however little did I know, one of the professors has been performing a research study on sunflowers. It's quite pretty actually, the entire greenhouse is filled with sunflowers and my little seedlings are lying beneath them (and still getting plenty of light). I began to notice little splotches on my seedlings' leaves however - the kind of splotches that typically develop where herbicide or a strong fertilizer is spilled. I can only assume that the sunflowers my poor little seedlings used to be under, were being given some sort of fertilizer treatment and while I do not have any direct evidence of this, I do know that those sunflowers are going to be guilty until proven innocent! (pounding fist on desk)

But enough about my seedlings, I am sure that you will hear more about them soon enough as I expect I will have them in the ground within the next three weeks and will have stories and organic gardening tips for you then.


The lady bugs were rushed so they didn't turn out as nicely as the flowers. See the ladybug's dots? When forming flat dots, you place the black dots on the red icing before it completely sets. It is good to wait about 30-45 seconds between flooding and placing your dots. If you try to put the dots on too soon, the two colors will bleed - you can see this by looking at the ladybug above. The black and red on the left wing bled together while the dots on the right were perfect.

Also, it is important that you don't mix the royal icing too much - there needs to be a happy medium. Not enough mixing and you won''t form the nice stiff peaks necessary for the proper texture and shiny look, but if you mix too much (as I did with the red), you will have a soft, spongy royal icing that appears slightly bubbly (i.e. not smooth and shiny) and never properly sets.


For those of you who have read this far down... the two most important rules when making sugar cookies are that you:
  1. Keep it thick - don't roll the dough too thin, when have you ever eaten a cookie and said, "mmm... I love how skinny and tiny this cookie is"...?
  2. Use real ingredients whenever possible, there is no question that making something from scratch using fresh, unprocessed ingredients is going to taste better.

Lastly, my Royal Icing Recipe uses real egg whites and covers roughly two dozen cookies:

Ingredients:
2 egg whites
1 t. vanilla (if you want white icing, either omit the vanilla or use clear white vanilla extract)
4 c. powdered sugar

How-To:
1.) Beat egg whites and vanilla until foamy.
2.) Add powdered sugar gradually until shiny.
3.) Beat until mixture forms stiff peaks.

Note: A good way to make sure that your peaks are stiff enough is by dipping a spatula into the mixture and pulling it out to form a peak. Then wiggle the bowl slightly - if the tip of the peak falls over, keep beating but if the tip of the peak stays pointing straight up, you're good to go!

Dunuts, Rhubarb Pie, Deli Buns, and Breakfast Bread!

Time to reminisce! I have been anxious to share these recipes first of all because they happen to have a happy ending (i.e. they were all delicious) and coincidentally, when there is a happy ending for me, there is one for you too because I love sharing good recipes! I am also anxious to share these recipes since once I am finished reminiscing, I will be able to get on with some scrumptious cold-weather food! YUM.
I love fall. What with apple orchards (and therefore apple cider, apple crisp, apple jam, caramel apples, and so much more), pumpkin patches (thus pumpkin pie, pumpkin bars, pumpkin soup, pumpkin carving...), and of course there's no way to forget the much anticipated loads of Halloween cookies, candy, and... bring on the sugar coma. So now that I am salivating, I do believe it's time I share some mouth-watering recipes!

First time making donuts!
Donuts!
These... were delicious, and in all honesty, pretty easy. I followed the recipe for a raised donut rather than a cake donut, but could not resist bypassing the classic glaze to instead slather the donut in chocolate frosting. Everything went smoothly except for one slight fiasco with the oil...

I consider myself a healthy person. I'm a Pilates instructor, a major veggie lover, and an avid distance runner. So when it comes to deep fried food... well I don't make it often. Or ever. I do not have a deep fat fryer and so simply filled a pot with oil and so had no way of knowing how hot the oil was. These donuts needed to be fried at about 250 degrees F. Little did I know at the time of frying these however, was that [olive] oil begins to boil only once it has reached 375 degrees F (the temperature varies depending upon what type of oil you are using) - as opposed to water which boils at a temperature of 212 degrees F. So, I had the genius idea that I would bring the oil to a boil and then fry the donuts - illogically assuming that oil and water boil at the same temperature! Tossing the first donut into the oil pot, I was surprised to see the doughnut instantly turn deep brown. Not even three seconds and my doughnut was finished! Actually, it was burnt. No worries though, only a couple more donuts were sacrificed before I managed to bring the oil down to a manageable temperature.

Oil, oil, oil. Time to find a
'healthy' donut!
The finished product was delicious and got me thinking... what if I made a healthy donut?? Yep, I said it!! These little circles of 'yum' are simple enough that made properly, they just might be delicious and less detrimental to our daily diet! Healthy and tasty... crazy right?! So that is on the to-do list as a future task... make a healthy donut that doesn't taste healthy. (Disclaimer: by healthy in this scenario, I do not intend to make a donut that fulfills your recommended daily vegetable servings... no, I merely mean to make a lower-calorie, lower-fat, and non-deep-fried donut that tastes as if it is in fact calorie packed, fat saturated, and totally deep-fried.) We all need our sweet-tooth fixes now and again, so lets try and make sure those fixes less guilty, shall we? Here's the recipe, I recommend trying it until I devise a 'healthy' donut...


Raised Donuts Recipe
(makes about 18 donuts)
  • 2 envelopes of active dry yeast
  • 1/4 c warm water (105 degrees F to 115 degrees F) - should be lukewarm to the underside of your wrist
  • 1-1/2 cups lukewarm water
  • 1/2 cup white sugar
  • 1 teaspoon salt
  • 2 eggs
  • 1/3 cup shortening
  • 5 cups all-purpose flour
  • 1 quart olive oil for frying
  • 1/3 cup butter
  • 2 cups white confectioners' sugar
  • 1-1/2 teaspoons vanilla
  • 4 Tablespoons hot water (or as needed)
  1. Combine yeast and warm water, whisk and let stand for 5 minutes, or until foamy.
  2. In a large bowl, mix together yeast mixture, milk, sugar, salt, eggs, shortening, and 2 c of flour. Mix until combined.
  3. Beat in remaining flour 1/2 c at a time, until dough no longer sticks to bowl.
  4. Knead for about 5 min, or until smooth and elastic. Place dough in greased bowl and cover with warm, damp cloth. Set in warm place to rise until doubled.
  5. Turn dough onto a floured surface and use rolling pin to roll to 1/2 inch thickness. Cut with a floured donut cutter (I used the lip of a glass to cut the perimeter of the donut out and simply used a butter knife to cut the inside hole).
  6. Cover and let sit to rise again until doubled.
  7. Heat oil in a deep-fryer or large heavy skillet or in pot to 250 degrees F.
  8. Make glaze now and set aside: Melt butter in saucepan over medium heat. Stir in confectioners' sugar and vanilla until smooth. Remove from heat, and stir in hot water one tablespoon at a time until the icing is somewhat thin, but not watery.
  9. Slide donuts into the hot oil using a wide spatula. Turn donuts over as they rise to the surface. Each side should be golden brown before removing.
  10. Remove from hot oil and set on wire rack to dry.
  11. Dip donuts into glaze while still hot, and return to wire racks to drain off excess. Keep a cookie sheet or tray under racks for easier clean up.
A beautiful crust (see recipe) covered in
it's first layer of sugar followed by
the single rhubarb layer.

Rhubarb Pie
I love rhubarb and not being able to grow it from the window gardens in my apartment is a little disappointing. In addition to that, my boyfriend, does not like rhubarb of any sort... I know, I know, hard to believe that anyone could not like rhubarb huh? So after buying rhubarb at the Minneapolis Farmers Market, I was on a mission of getting Brandon to love rhubarb... I made the sweetest, most cavity-causing pie I possibly could (he has a bit of a sweet tooth). I think you will get the idea after checking out some of these pictures (and no, this is not 'Splenda' you are seeing)

Pie Crust Recipe
(makes two open-topped pies, or one if you want a sealed pie)
  • 2 cups whole wheat flour
  • 2 cups all-purpose flour
  • 1-3/4 cups shortening
  • 3 Tablespoons white' sugar
  • 2 teaspoons salt
  • 1 egg
  • ... just a pinch more sugar!
  • 1/2 cup water
  1. In a large mixing bowl, combine all-purpose flour, shortening, sugar, and salt. Blend together until crumbly.
  2. In a small bowl, mix the egg water. Blend into flour mixture.
  3. Use immediately or store in airtight container and refrigerate until ready to use.
Rhubarb Pie Recipe
(makes enough for one pie)
  • 4 cups chopped rhubarb
  • 1-1/3 cups white sugar
  • 6 Tablespoons all-purpose flour
  • 1 Tablespoon butter
  • 1 (9 inch) double-crust pie crust
  1. Combine sugar and flour. Sprinkle 1/4 of it over pastry in pie plate. Heap rhubarb over this mixture, sprinkle with remaining sugar and flour.
  2. Dot with small pieces of butter, cover with top crust.
  3. Place pie on lowest rack in oven, bake for 15 minutes at 450 degrees F, then reduce temperature to 350 degrees F and continue to bake for 40-45 minutes.
  4. Remove from oven and serve immediately or refrigerate (I recommend using a dollop of whipped cream or ice cream!).

Okay, so after using the word "dollop" in the end of that last recipe, I couldn't resist looking that word up in the dictionary. Dollop just seems to be one of those words that you know is going to have a good description. So here ya go, I hope you find it as funny as I did...
dol·lop/ˈdäləp/
  • A shapeless mass or blob of something, esp. soft food
    • great dollops of cream
    • a dollop of romance here and there

Cheese Bread
BREAD!
This year was my family's second-annual cabin trip. The trip began in 2009 when my aunt and uncle built a cabin on their lake front property. This year I was in charge of putting the meals together and deciding the fate of everyone's diet for the week (muah ha ha ha!). To keep the cost down and get everyone involved in cooking, I decided to assign people to groups and those groups to particular meals (breakfast, lunch, dinner). It was then the duty of each group to decide what they would prepare for their assigned meal. Besides deciding what they would make, the group was also in charge of supplying the ingredients they would need to make their particular meal for the entire family. For snacks, each group was also assigned to bring an additional item or two such as a few bags of chips, a bowl of fresh veggies, bread, etc.

Being that I absolutely love bread and avoid buying the stuff if at all possible, I assigned myself the duty of supplying the family with bread for the weekend. This was a major task since I am used to only making enough bread for two people, not 10-plus. Since everyone has different preferences and this because this bread would be used for breakfast and lunch, I used two different recipes. The night before leaving for the cabin, I rolled up my sleeves and began baking. It was 5:00 pm.

My first recipe is a Golden Cheese Yeast Bread. Unfortunately the only cheese I had on hand was mild cheddar so the cheese taste was not as powerful in the finished deli buns as I had hoped, but still quite moist and tasty. I suggest sprinkling some shredded cheese on top of the loaves a little over halfway through the baking process too for added flavor and to boost the bread's appearance.

getting ready
for the first rise!
Golden Cheese Yeast Bread Recipe
(makes about 2 loaves)
  • 6 cups all-purpose flour
  • 2 cups shredded cheddar cheese
  • 3 Tablespoon sugar
  • 2 (.25 oz) packages active dry yeast
  • 2 teaspoons salt
  • 2 cups warm milk
  • 1 egg
  1. In a large mixing bowl, combine 3 cups flour, cheese, sugar, yeast and salt.
  2. Add milk and egg; beat on low speed until smooth.
  3. Stir in enough remaining flour to form a soft dough. Turn onto a floured surface; knead until smooth and elastic (about 6-8 minutes)
  4. Place in a greased bowl, cover and let rise in warm place until doubled (about 1 hour).
  5. Punch dough down. Divide in half and shape into two loaves. Place in two greased 9-in. x 5-in. x 3-in. loaf pans... OR... using a bread knife, cut small handfulls off, folding bottom in, to create a small bun shape. Place on greased cookie sheet.
  6. Cover and let rise in warm place until doubled (about 45 minutes)
  7. Bake at 375 degrees F for 25-30 minutes or until golden brown.
  8. Remove from pans to cool on wire racks.
I wanted my second bread to be a little sweeter and more indulgent. I settled on making Simple Whole Wheat Bread. Since I had it lying around, I decided to use multi-grain flour for 1/4 of the recipe's flour. Rising the bread would have been a bit tricky since the evening was a little cooler than I had expected. Thanks to a little trick, I was able to rise the bread just fine while keeping it extra moist...

Here's my trick: fill a pot with water and put it on the stove top until the water is at a rolling boil (the hotter the water, the better). Next arrange the wire racks in your oven so that you can fit your pot of water on the bottom rack while your pans of bread will still be able to fit on the top rack. (note: you will not be turning on the oven so it does not matter how close to the heating elements you get). Take a kitchen hand cloth or something similar that is large enough to completely cover the bread, I use one cloth per pan. Dampen the cloth under the sink faucet and ring it out; use this to cover your bread... this also keeps your bread extra moist. Finally, after placing your covered bread pans on the top oven rack, slide the boiling pot of water onto the bottom rack beneath the bread. Close the oven immediately and let the bread rise. By having the pot of boiling water in the oven with your bread, you are creating a moist and warm environment for the yeast to grow.

mmm, honey!
Simple Whole Wheat Bread Recipe
(makes about 3 loaves)
  • 3 cups warm water (110 degrees F - or warm but not hot when touched to the underside of your wrist)
  • 2 (.25 oz) packages of active dry yeast
  • 1/3 cup honey (I used half a cup of honey though :)
  • 1 Tablespoon salt
  • 3-1/2 cups whole wheat flour (have fun and experiment! Try some multi-grain flour here)
  • 2 Tablespoons butter melted
  1. In a large bowl, mix warm water, yeast, and 1/3 cup honey. Add 5 cups white bread flour, and stir to combine. Let set for 30 minutes, or until big and bubbly.
  2. Mix in 3 tablespoons melted butter, 1/3 cup honey, and salt. Stir in 2 cups whole wheat flour.
  3. Flour a flat surface and knead with whole wheat flour until not real sticky - just pulling away from the counter, but still sticky to touch. This may take an additional 2 to 4 cups of whole wheat flour. Place in a greased bowl, turning once to coat the surface of the dough.
  4. Cover with a (damp) dishtowel. Let rise in a warm place until doubled.
  5. Punch down, and divide into 3 loaves. Place in greased 9 x 5 inch loaf pans, OR create buns by folding small hand fulls of dough inside itself until you have a nice round bun shape. Place on greased cookie sheet.
  6. Allow to rise until dough has topped the pans by one inch.
  7. Bake at 350 degrees Fahrenheit for 25 - 30 minutes; do not over bake!
  8. Lightly brush the tops of loaves with 2 T melted butter when done to prevent crust from getting hard. Store in airtight container.

All packed up and ready for the cabin at 11 pm! I was exhausted but ready for a relaxing week on the lake!
(Tip: save bags from your boughten bread... they come in handy and serve as a good way to reuse some plastic rather than starting a brand new plastic bag)