Red White and Blue Cake

It's almost the 4th of July and what better way to kick off the holiday than with a patriotic cake?


This recipe starts off with a white cake batter which is split in two and each half is dyed its own color - one red, one blue. The frosting is a homemade buttercream and to stay with the summertime/ patriotic theme, I added a handful of blueberries and strawberries.

I am providing the recipes for both the buttercream and the white cake at the end of this post. The cake recipe will fill two 9x3-inch round pans (or three 9x2 inch pans). To make the bright colors of the cake more dramatic, I cut each 9-inch cake in half horizontally so that I ultimately had four layers. Because the edges of the cake bake faster than the center (and therefore cakes always have a dome on top), each layer was not perfectly flat... you can still have a beautiful cylinder-shaped cake though! -simply add more buttercream around the outside of the cake as you are piecing the cake layers on... so the layers should fit together kind of like Legos and still be parallel to your counter top. Just remember... you can never have too much buttercream! Yum.


Use a piping bag to fill in any holes along the side of the cake and then take an extra large spatula or bowl scraper and slowly wrap the scraper around the cake to even all the buttercream out so you have a relatively smooth side to work with. This works well if you have a cake turntable as it will allow you to circle all the way around the cake without stopping. It does not matter if cake is still showing through the buttercream because you can always cover this up with more buttercream later if you chose to do a basket weave pattern. If you are in search for a turntable, I highly recommend this one as it is non-slip and has a handy-to-reach stopper for those cake decorating moves that you do not want your cake spinning in circles for! (see above image)

Next I added a basket weave pattern to the outside of the cake. I am in the process of creating a basket weaving tutorial but until I am finished with my tutorial, you can find a relatively easy one here. Just keep in mind when doing a basket weave, that you can use any piping bag tip that you want. I used number 21 for this cake. A lot of the tutorials you will find online tell you to use a flat tip but I prefer using a star tip because it gives the basket weave a little more dimension. (see below image)


After completing the basket weave, I covered the top of the cake in buttercream and again flattened it using an extra large spatula. This also works best when using a turntable. Keep in mind with this cake however, that the top does not need to be impeccably flat as it will be covered in strawberries and blueberries! Oh the joys of adding things to a cake which not only make it yummier... but also easier for you to decorate!


The border around this cake is called a shell border. This is honestly a very easy border to make and once I release my tutorial, I hope you will all try this on your next cake! (until then, try this tutorial). It can be very rewarding to find that something so elegant is actually very easy to do! I kept the size 21 tip on for these shells, however there are several different tips you can use for these in order to get different textures.


Lastly, once the basket weave was complete, the top frosted, and the border was, well, surrounding the border of the cake... it was time to make this cake fruity and festive!


Oh and you know how I'm all about local food? Well, these strawberries are from the backyard of my boyfriend's mothers house right here in Minnesota, picked only two days ago... and boy can you taste the difference! You can't get fresher strawberries than that. Thank you Nancy!


White Cake Recipe
10 Tablespoons butter (1 stick plus 2 Tablespoons) - softened
1/4 cup oil
1-1/2 cups milk (I used skim)
6 egg whites
1 Tablespoon plus 2 teaspoons clear vanilla (if you don't have clear vanilla on hand, it's not a big deal, especially if your're dying the batter a bright color as I have done)
2 Tablespoons baking powder
3/4 teaspoon salt
2-1/4 cups granulated sugar

1.) Prepare two 9x3 inch pans (or three 9x2 inch pans). Preheat oven to 350 degrees F.
2.) In medium bowl, lightly beat milk and egg whites together. Add vanilla. In a second bowl combine flour, baking powder, and salt.
3.) In a third bowl, beat butter for 30 seconds. Add sugar, beat for about 1 minute. Gradually add oil, beat on high for 2 minutes.
4.) Add flour mixture to butter mixture in three phases, alternating with milk mixture - you should start and end with the flour mixture (So, add 1/3 of flour mixture followed by 1/2 of milk mixture, then next 1/3 flour mixture, followed by the remaining milk mixture and lastly remaining flour mixture).
5.) Optional: If you wish to color the batter something other than white: Separate the batter into however many bowls/colors you wish. Using any basic food dye, create the colors you want.
6.) Pour cake batter into the prepared pans and bake for about 30 minutes or until inserted toothpick comes out clean. (keep in mind that adding liquid food dye to the batter may make this baking time longer as it may have made the batter slightly more runny).
7.) Let cake cool in pans for 5 minutes before removing to let cool on cooling rack.

Buttercream Recipe
22 Tablespoons butter (if unsalted, add a pinch of salt to the bowl)
2/3 cup crisco
2 teaspoons clear vanilla
5 Tablespoons heavy whipping cream
2 lbs confectioners sugar (this is typically exactly one bag)

1.) Beat butter and crisco (really blend these two together - I usually blend on high for about 4 minutes).
2.) With mixer on low, add vanilla.
3.) Stream in cream while mixer is still on low.
4.) Blend on high, 3 minutes (should become thick and creamy now).
5.) On low, gradually add confectioners sugar (this step is usually a bit messy... the slower you go here, the less messy the sugar will be for you).

*Tip: if you are using this recipe to frost a cake, you do not want the buttercream to form stiff peaks as this will cause the cake crumbs to come off the cake and into your buttercream as you're spreading it on the cake. If your buttercream is able to hold a stiff peak in the bowl, add 2 Tablespoons heavy whipping cream and 1 Tablespoon corn syrup and blend. Continue adding these ingredients in a 2-1 ratio until you have the consistency you desire (and don't worry if it gets too runny - just add small amounts of confectioners sugar into the frosting until you get it right!)

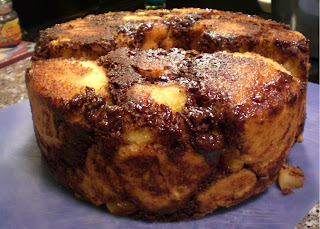
Monkey Bread!

Who loves the smell of bread and cinnamon together?! Now add my secret ingredient: apples! (Ahem, those of you following me on Twitter: apples were the secret ingredient!) Yay!


This monkey bread is moist, sweet (but not too sweet - it's perfect with coffee or an earl grey tea, whatever your poison may be) and is super easy to make. For those of you who have never heard of or eaten monkey bread... it's kind of like a cinnamon pull-apart but is at an entirely higher level of awesome!


I grew up seeing my mom make monkey bread in an angel food pan but have noticed that a lot of people like to use bundt pans. I love a moist, fluffy bread that really rises, so used the large angel food pan here. I recommend either using an angel food pan as I have done or cut the recipe in half if you really want to use a bundt pan. This recipe will rise a lot so tying to fit it all in a bundt pan... well, lets just say that you may end up with a very messy oven and a strong hatred for me.


For this recipe you will need to make a bread dough first; then you can add the ooy-gooiness that makes this recipe oh sooo yummy!

Step One: Make Butter Rolls

Moist Butter Rolls Recipe
Ingredients:
2 packets yeast
1/2cup + 1 Tablespoon granulated sugar
1 cup milk
3 eggs
1/2 cup butter
4-1/2 cups flour (both white and wheat work well here without substitutions)
1/ teaspoon salt

How-To:
1.) Mix yeast and 1 Tablespoon sugar together. Add warm (not hot, you don't want to kill the yeast!) milk and whisk. Also whisk in: remaining 1/2 cup sugar, salt, and melted butter (I recommend melting the butter, then letting it cool for a few minutes before adding it - this way it won't kill the yeast).
2.) Beat eggs lightly (until somewhat lighter in color) and add to yeast mixture.
3.) Gradually add flour until the dough is pulling away from bowl. Knead for three minutes on a floured surface.
4.) Cover with damp towel and let raise 30 minutes in warm environment.

Step Two: Turn the Butter Rolls into Monkey Bread!

Monkey Bread Recipe:
Ingredients:
1 batch homemade bread (I recommend using the Butter Roll recipe used above)
1-1/2 cup granulated sugar
3 Tablespoons ground cinnamon
1/2 cup melted butter
1/4 cup whipping cream
2 apples cut to the size of candy corn(you can also substitute with raisins - use 1-1/2 cups raisins if you choose to go this route)

How-To:
1.) Grease one angel-food pan and set aside.
2.) In small bowl, mix together cinnamon and 3/4 cup sugar.
3.) As you cut golf ball-sized pieces of bread dough off homemade bread, dip one piece at a time into the melted butter and then into cinnamon/sugar mixture. Place in greased angel food pan and repeat until you have covered the bottom of pan with an entire layer.
4.) Sprinkle half the chopped apples or raisins. Then add a second layer, following the process explained in step three. Continue this pattern until you have used all the bread and apples/raisins.
5.) Whisk whipping cream, butter, and remaining 3/4 cup sugar together just until color and texture lightens. Pour this mixture over the top of bread and apples/raisins.
6.) Bake at 350 degrees F for about 45 minutes minutes or until inserted toothpick comes out clean.

*Serve immediately, store in air-tight container.

Graduation Season Part II: It's My Party!

It is official, my family knows how to throw an awesome party! With locally produced meat kabobs, a margarita bar, and everything occurring outside... this party was screaming my name! Today's post is about my family, me, and the amazing food that was at my graduation party.

As some of you may know, I am a meat locavore. This means that I eat meat only if it has been produced locally (i.e. raised and butchered locally - not simply packaged locally). All locavores have different parameters for what defines "local" - for me, I only eat meat that has been produced within 70 miles of wherever I am. Now, I looove meat and am not a vegetarian as many people mistakenly believe. Heck, I grew up on a dairy farm where we would pluck our own chickens for dinner and name our beef cattle after food to remind us that our "pet" would one day be our dinner. So I get it... the circle of life. It happens. In fact, my reasoning for being a locavore is that I am passionate about supporting small, local farming. I have been dedicated to this method of meat consumption for over three years now and over the course of that time, I have had many people ask me why I don't eat very much meat, especially considering the fact that my immediate and extended family all farm. My answer to this is that I not only support small farmers, but I also see no point in shipping meat from California to the Midwest (for example) when there is undoubtedly a meat-producing farm within at least a 70 mile radius of where I am. All of this shipping is not only wasted emissions, but is also upping the price which the consumer must pay to buy the meat at the store and decreasing the price our farmers receive for selling their meat. SO, with eating locally being such a passionate dedication of mine, I was pretty excited to hear that all the meat being served at my party... would be local! YAY!

My older sister Krystal and my Mom were the ones planning this fiesta. The menu consisted of orderves (meat/veggie kabobs, fruit kabobs, my Grandma's seafoam salad (trust me... it's amazing. I will have to dedicate an entire post to this stuff!), cheese produced from my aunt and uncle's dairy farm, a summer pasta salad, and guacamole (and not just any guac... this was Krystal's guacamole. I don't know what she does to it, but it is always amazing. She's given me her recipe, but mine never tastes the same... I have come to the conclusion that there are some secret ingredients at play here.). Oh... and then there were my cupcakes. Yum. Everything was made from scratch. Everything fresh. Everything delicious.

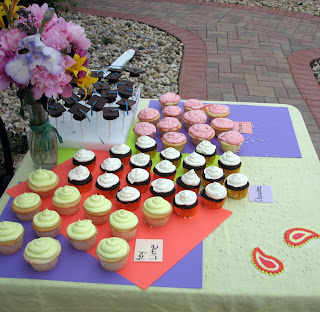
So I have never been terribly dedicated to cupcakes, I've actually always been more of a cake girl. But since making these little buttercream mounds of happiness... I'm hooked. For this party, I made three flavors. The first was a dark chocolate cupcake with a "healthy" (ha!) amount of light and fluffy white buttercream on top. They were then finished off with a little bling by adding some glitzy white sugar pearls (as recommended by my little sis', Michelle). Nice work Michelle, you were right (you may now imagine me furrowing my eyebrows at you).


This is my little sister Michelle. She also did a lot of the cooking and baking. She was like everyone's sous-chef. Michelle rocks at making scrumptious desserts; her specialty is crazy desserts I can't even begin to pronounce the names to. Her desserts are like the kind that you might be served in some five-star French restaurant. Since she has been baking more and more lately, I made her a super chic apron...


So the second cupcake flavor I made was key-lime. Yep, you heard me right. Key-lime. It was delicious. I used a white cake batter for the cupcake and for the buttercream, I used almond extract instead of clear vanilla (since sliced almonds go perfectly on top of a key-lime pie) and then squeezed about 1.5 ounces of lime juice into the buttercream. This was a refreshing and perfect summer's night cupcake.


The third and last flavor cupcake I made, was strawberry. Again I used a white cake for the cupcake. Then, starting with my basic white buttercream, I mashed enough strawberries to produce about 2 ounces of strawberry puree and again topped these cupcakes with white sugar pearls. Since buttercream has a high content of fat (ahem, it IS buttercream) and the strawberries are, well, strawberries (and are therefore composed of essentially sugar and water), the two didn't blend perfectly together and created more of a streak-effect. They looked pretty neat...


The party was outside on the patio that my Mom and Dad built by hand (the party was in Wisconsin, on the farm where I grew up). Oh, and the flower arrangement on this table was created by my little sister Michelle using clippings from various plants around the farm. So beautiful.


I also made some graduation cake pops, similar to the ones made last week for Andrew's Graduation Cake - except for these ones, I made the tassel blue to match my own graduation tassel. I think I turned my cousin Dean into a cake pop lover as well.


The actual orderves at this party were not only local... but were tasty. Super tasty. My sister Krystal was in charge of the kabob front, she's pretty much a master behind the grill. Oh, and see that person off in the distance, staring at the camera? Yep that's me. I'm holding a stick with pineapple on the end like a caveman. For some reason I thought the picture was of me even though my sister was obviously between the camera and I. But hey, it's my party right? Shouldn't the camera always be on me?... No?! Hmm, shoot.


You can see a few of the harvesters and the barn off in the distance. This is where I grew up. This is my stomping ground. I've done a lot of travelling, and this is still my favorite place on Earth. Sorry for going mushy here, but it's true.


So to make this party even better, Leah, one of my best friends from high school, came by. We've actually been friends since first grade. Leah is one of the most hilarious people you will ever meet.


These folks are my Mom and Dad. I am who I am because of these two amazing people. You may think I am being biased here, but I don't think there's ever been a better Mom and Dad duo than mine.


My party had a lot of great food at it, but what's more important is that I was surrounded by people who I know and love and who have been such a major part of my life. I am so lucky to have such a supportive family and wonderful friends. Thank you everyone for supporting me in everything that I do.

p.s. Thank you for such a great party, I feel so loved.

Graduation Season Part I: The Graduation Cake

This is a two-part series. I recently made a massive graduation cake and in the coming days, I will be posting a whole lot of super cute graduation cupcakes!

So I have been talking this graduation cake up for quite some time now. You know... the one that needed to feed 100+ people and was going to be covered in beautiful golden fondant?

Well, there were a dew mishaps along the way. You see, I have a killer chocolate cake recipe... and I mean killer. This chocolate cake is so moist that it will make your taste buds think they've died and gone to heaven. I designed this recipe myself (after a lot of trial and error), but have used the recipe quite a few times since evolving it, so it has stood the test of time. Unfortunately however, I have never baked this recipe in a 12x18 inch pan. So ultimately what happened (to make a very long story... so very much shorter than it really was), my chocolate cake recipe uses an oil to achieve part of its moistness and because in this scenario I was using such a large pan and was therefore using a longer baking time... all the oil separated and sank to the bottom of the pan, leaving the top half of the cake mega fluffy and dry while the bottom half was more dense than a 90 lb pound cake, yuck!


So in the end, I used a different recipe - one that was far less moist and far less chocolaty - the new recipe was more of a generic type that not even my cat could mess up if she had thumbs. Since I was using a dry cake recipe, I decided to ditch the plans of draping this cake with fondant (since fondant is really only good on a moist cake) and decided to use my buttercream recipe instead.

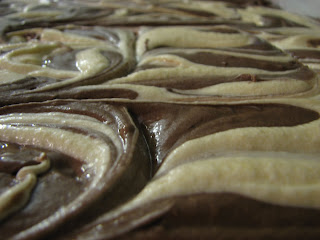
The graduate requested that this cake be marble so for each pan, I made two batches of chocolate cake and a quarter batch of the yellow cake. Then, it was dollop time!


Followed by swirl time!


Oh yes, and I used a TON of eggs! (and butter... of course)

The baking time for this cake was an hour... so with the weather being in the balmy 90's, I was in one hot apartment!

It took three 12x13 inch pans to assemble this cake.


After baking the cakes, I arranged them onto a large wooden board covered with foil and plastic wrap to make it pretty. Once the cake was covered in orange buttercream, I wrapped a 1-5/8 inch black ribbon around the border to tie in the school colors (black and gold) and to make the buttercream look less sloppy (after all, I had my mind set on fondant, so I struggled to comprehend that the buttercream was going to give the cake less of an elegant effect and more of a "I want to eat this cake right now" effect).


And of course, no job is ever finished until it has been attacked with cake pops...
(and no, those are not peanut butter cups, I used a candy mold to make the ridges and there's chocolate cake when you bite through the chocolate)


Then after using chocolate to glue the chocolate tops to the chocolate bottoms...


...and some lemon licorice tassels...
The graduation cap cake pops were finished!


Then since this graduate is a track and cross country athlete, I drew each sport's symbol in dark chocolate. Below is the track symbol and you can see the cross country symbol in the last picture of this post.


Lastly, I baked an extra chocolaty mini cake for the graduate. His favorite cake is dark chocolate. All of the cake that I had made up until this point was marble since that's something more people at his party would like. I figured that since this graduate was willing to sacrifice getting his favorite cake at his own party, I could make him a personal, extra moist, extra chocolaty cake.


Once I stuck the cake pops into this cake, it really looked nice. Everything pulled together and everyone was happy with the results.

Congratulations Andrew!